
Steps to Install Impact Designer in PrestaShop
► To install Impact Designer in PrestaShop, review the Technical Requirements to ensure your server meets all the necessary conditions to install and use Impact Designer.
1. Upload the package to a server root directory that points to a subdomain (recommended) or any domain.
2. Unzip the package on the server using the unzip command through SSH or with the help of your server’s cPanel file manager.
3. You must be able to get the installation link for Impact Designer for your site, which would look something like this: https://www.abc.com/impactdesigner/install
4. Run the installation link (EX: https://www.abc.com/impactdesigner/install) in your browser tab. You will see the Installation Wizard of Impact Designer.
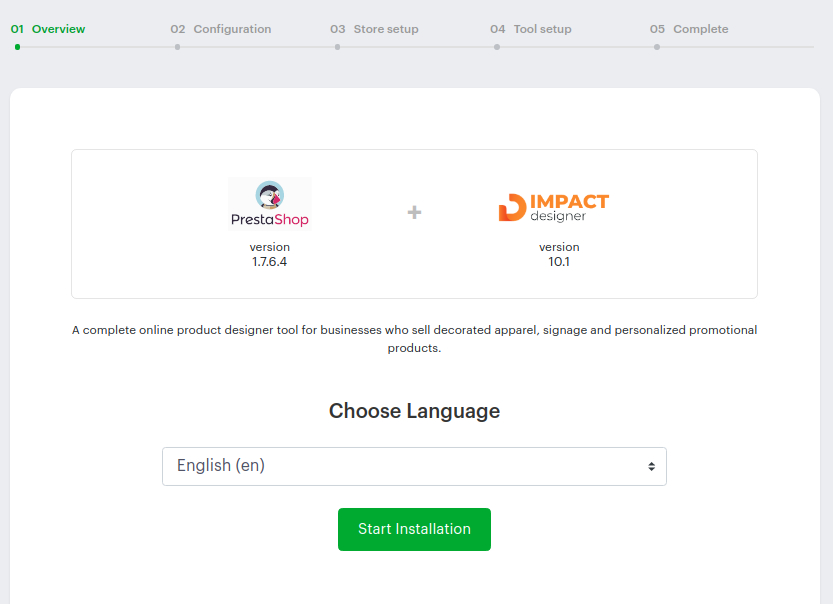
5. In the first step, you can view your E-Commerce platform and the Impact Designer version. Choose your preferred language for installation, then click “Start Installation” to proceed to the next step.
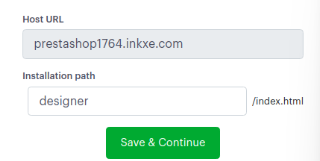
6. In the text box of the Host URL, your domain name will be populated. The domain name in the Host URL should match your website name.
7. In the text box of the Installation Path, it shows the folder name where Impact Designer will be installed. By default, the folder name would be set as “designer.”
8. Click “Save & Continue.”
► If the domain name of installation does not match your registered one, the installation will not proceed to the next step. You have to download the package again with the correct domain for which you have registered.
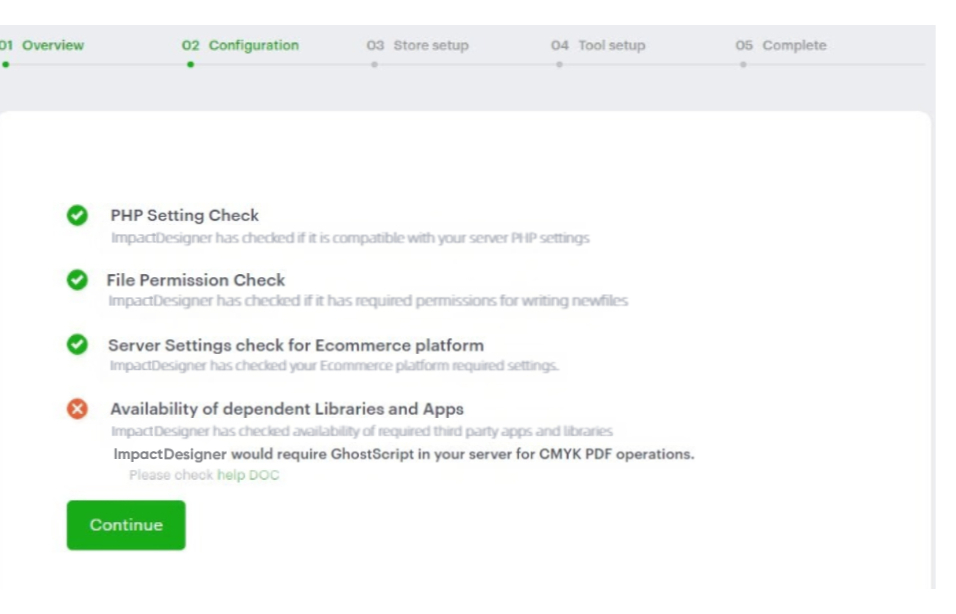
9. In the next step, verification of server configuration is done. Any configuration that is not available on your server will show as a red cross. Follow the guidelines of the Impact Designer Server Requirements, make the necessary changes to your server, and click “Continue.”
► “Availability of Dependent Libraries and Apps” checks if ImageMagick, Inkscape, and Ghostscript are installed on your server. These are required to generate print files in CMYK format. If this shows a red cross mark, you can still move to the next step, as this is optional.
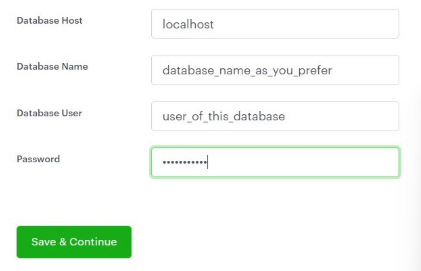
10. Under Database Details for Impact Designer, provide the database details. All data related to Impact Designer will be stored in this database. Before giving the details, create the database for Impact Designer. Then input the details like Database Host, Database Name, Database Username, and Password.
► We suggest creating a separate database for PrestaShop and Impact Designer so it will not affect future Impact Designer updates.
11. Click “Save and Continue.”
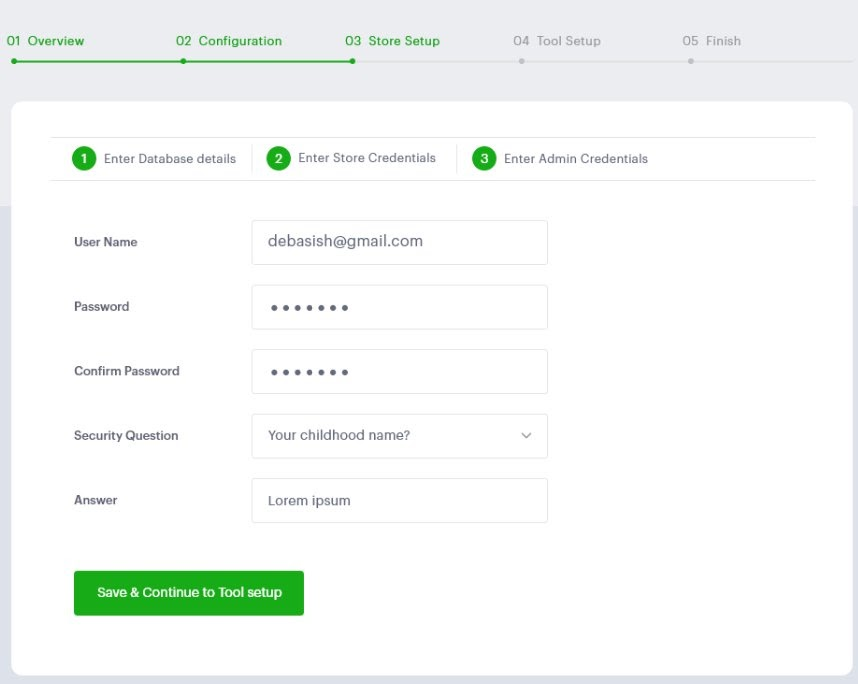
12. A new page will open, Enter Store Credentials. In this step, the CMS page, web service key, and PrestaShop custom modules will be created.
13. In the next wizard, Enter Admin Credentials, provide the details for logging into the Impact Designer Admin panel. Enter the details like Username, Password, Confirm Password, Security Question, and Answer. Click “Save & Continue to Tool Setup.”
► Keep the credentials with you for logging into the Impact Designer Admin panel after the installation is complete.
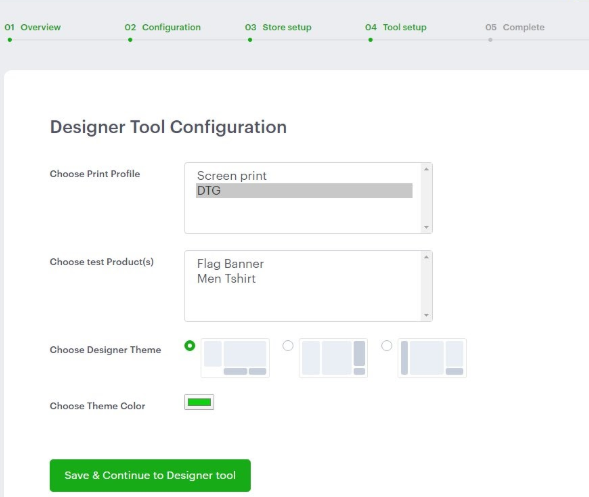
14. In this step of Tool Setup, select your desired printing method from Choose Print Profile. Then select the product from Choose Test Product(s). The demo products and print profile will be created in your Impact Designer. You can also edit and delete them later.
15. In Choose Designer Theme, choose your theme for the Designer Tool. From Choose Theme Color, click on the green color box. A color picker will open — select your theme color for the Designer Tool.
► The layout of the theme and theme color can also be changed from the Impact Designer Admin.
16. Click “Save & Continue to Designer Tool.”
17. In the Complete Step, click “Designer Admin,” and a new tab will open for the dashboard of the Impact Designer Admin panel. Enter your username and password to log in. Click “Designer Tool”, and a new tab will open on a product page with a Customize button. By clicking, it will redirect you to the Designer Tool.
► To view the Customize button on a product page, you need to clear the cache from the PrestaShop store. Navigate to: PrestaShop Admin >> Advanced Parameters >> Clear Cache >> Save.